Scenario
Imagine we are are a dropshipping supplier for e-commerce stores around the world. Clients receive orders from their end-customers and forward them to our backend to process and deliver them. We are going to automate the process of receiving orders by exposing APIs. In order to distribute the load, we are providing the endpoints to receive orders based on the geography. For example, we have an endpoint to receive orders from Sydney, Australia etc.
Here is the high level architecture of the system we are going to design in this blog post.
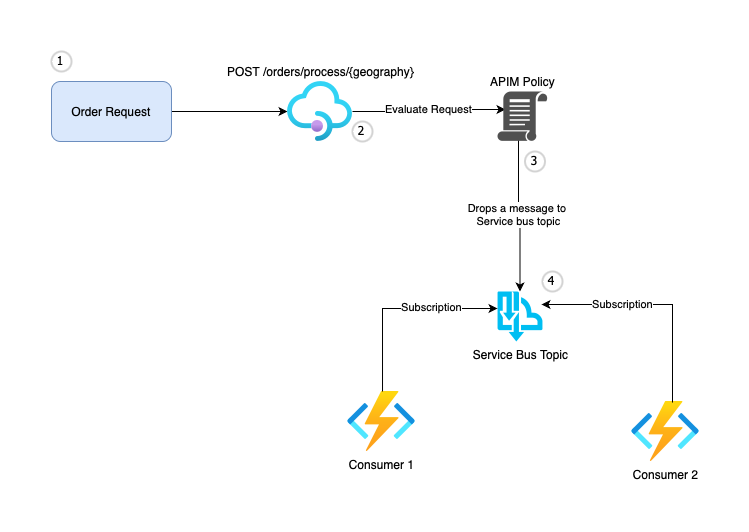
We will use Azure API Management to expose the endpoints and make use of Azure APIM policies to send the orders to Azure Service Bus Topics. Service Bus Topic will have different subscriptions to receive orders for different geographies. At the end, we will have multiple consumers (in the form of Azure functions) to process the messages from the Service Bus Topic for respective subscriptions. This architecture, allows us to scale the processing of orders based on geography. We can have multiple consumers to process the messages from the Service Bus Topic to distribute the load.
Before we dive into the details, let's understand the components we are going to use in this demo.
Service Bus Topic
Azure Service Bus is a fully-managed enterprise integration message broker. It provides reliable message delivery between applications and services, even when one or more of the endpoints are offline. Service Bus supports a variety of messaging patterns, including publish/subscribe, request/response, and message queuing. It also provides features such as message batching, dead-lettering, and message deferral. Service Bus can be used to decouple applications and services, enabling them to scale independently and evolve over time.
One of the core components of Azure Service Bus is the Topic, which can be used for publish/subscribe scenarios. Messages are sent to a topic and delivered to one or more associated subscriptions.

API Management
Azure API Management (APIM) is a fully managed service that enables customers to publish, secure, transform, maintain, and monitor APIs. It provides a unified experience across the entire API lifecycle, enabling developers to create APIs and app developers to consume them easily.
API Management Policies
Azure API Management policies are a set of rules that are executed by the API Gateway when a request is made to an API. These policies can be used to modify the request or response, enforce security, or perform other actions. Policies can be defined at the API level, the operation level, or the product level. Azure API Management provides a rich set of built-in policies and also allows you to define custom policies using XML and C# (policy expressions).
When integrating APIM with Azure Service Bus Topic, the idea is to allow APIM to publish messages to the Service Bus Topic by using one of the built-in policies. This makes is very easy for us to send messages to the Service Bus without having to write any code.
Provision the Infrastructure
Let's walk through the steps to provision the required infrastructure. I'm using Azure CLI (az cli) to provision the resources. You can use the Azure Portal, ARM templates, or PowerShell to do the same.
Set the account
# Login & set appropriate subscription
az login
az account show
az account set --subscription <subscription-id>
Create a resource group
We will create all of the resources in a single resource group.
# Define a variable which we will use later
resourceGroupName=azecommstore

# Create the resource group
az group create --name $resourceGroupName --location australiaeast
Create Azure API Management Service
Here, we will provision the consumption tier of Azure APIM, create the API, and set up a operation (endpoint) that will receive requests from clients.
For this demo, I'm leveraging system-assigned managed identity to establish secure communication between APIM and Service Bus.
The --enable-managed-identity flag is going to create a System Assigned Managed identity for the APIM. You could create the user-assigned managed identity and use that as well. In fact, I would recommend that. However, there is no support for creating user-assigned managed identity using Azure CLI, you would have to use ARM templates, PowerShell, or the Portal.
# Define variable, which we will use later
apimName=azecommstoreapimae

# Create APIM instance with managed identity enabled
az apim create --name $apimName --resource-group $resourceGroupName --location australiaeast --publisher-name Sanjay --publisher-email admin@gmail.com --sku-name Consumption --enable-managed-identity true
Create API
Now that we have the APIM instance ready, let's create an API that will receive orders for us.
az apim api create --service-name $apiName -g $resourceGroupName --api-id Orders --path '/orders' --display-name 'Orders'
Create API Operation
Once we have the API, let's create a POST operation that will receive the request from the client and send the message to the Service Bus Topic.
I'm creating a generic endpoint here (e.g., /process/), so that we can have as many URLs for geographies (e.g., /process/sydney, /process/melbourne etc.) without defining separate operations.
az apim api operation create --resource-group $resourceGroupName --service-name $apimName --api-id Orders --url-template "/process/{geography}" --method "POST" --display-name 'Process Orders' --description 'Process Orders for E-Store'
Create Service Bus Resources
Here, we will create the Azure Service Bus namespace, topic, and subscription. We will also create a rule on the subscription to filter messages based on the originUrl header (will explain a bit later about this). This will allow us to route the messages to different subscriptions based on the originUrl header.
Namespace
# Define variable, which we will use later
serviceBusNamespace=azsbnsorders

# Create a namespace with standard SKU
az servicebus namespace create --name $serviceBusNamespace --resource-group $resourceGroupName --location australiaeast --sku Standard
Service Bus Topic
az servicebus topic create --name orders --resource-group $resourceGroupName --enable-partitioning false --namespace $serviceBusNamespace
Service Bus Topic Subscription
We can create multiple subscriptions to forward messages as they come to our topic. I'm creating a subscription for processing orders coming for Sydney.
az servicebus topic subscription create --name sydneyorders --resource-group $resourceGroupName --namespace-name $serviceBusNamespace --topic-name orders
Service Bus Topic Subscription Rule
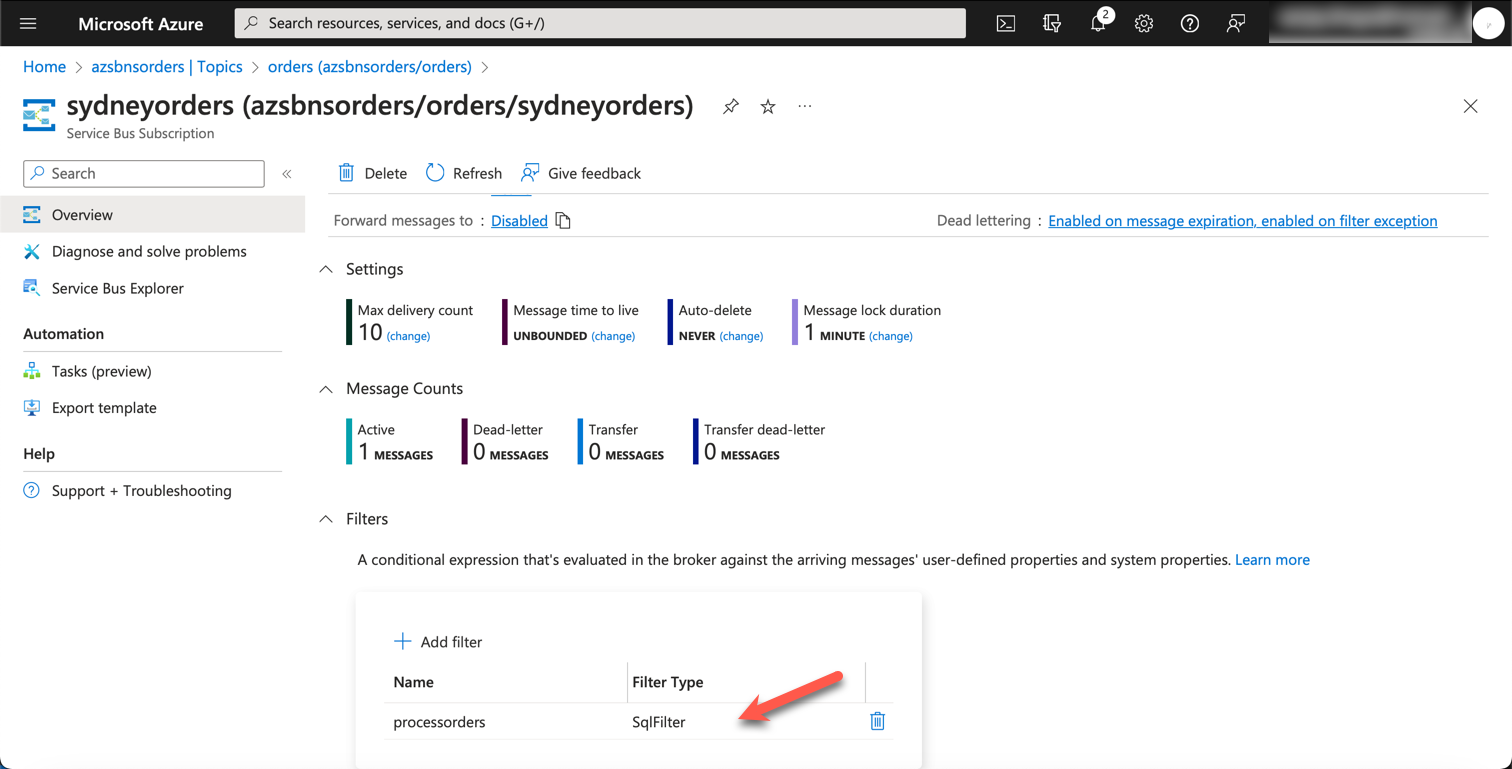
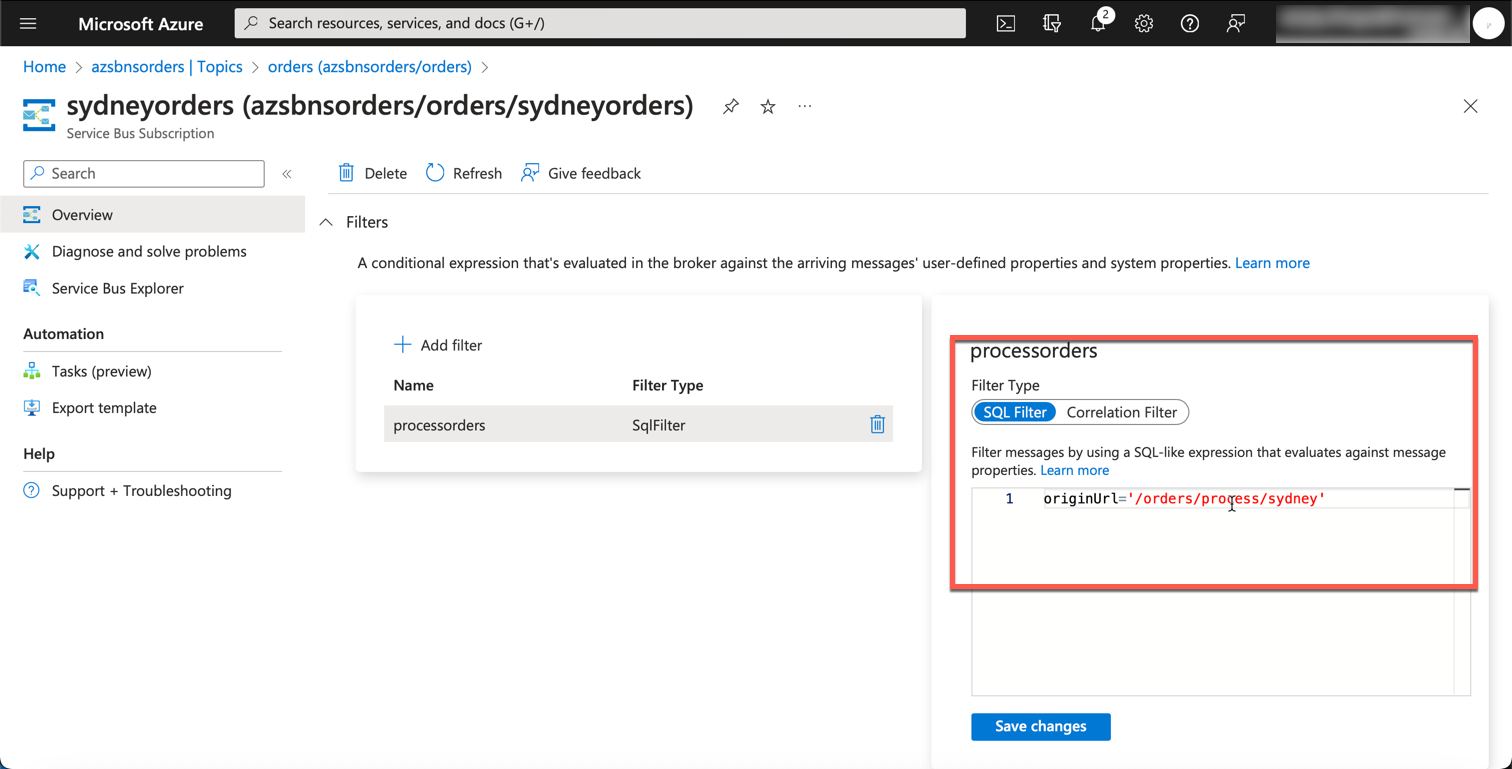
The way we route messages to subscriptions is via filters. Here, we are creating a SqlFilter based on the originUrl custom property that will be coming with incoming messages to this topic.
az servicebus topic subscription rule create --resource-group $resourceGroupName --namespace-name $serviceBusNamespace --topic-name orders --subscription-name sydneyorders --name processorders --filter-sql-expression "originUrl='/orders/process/sydney'"
Assign Permissions to Service Bus Namespace
In order for APIM to send messages to the Service Bus Topic, we need to assign the Azure Service Bus Data Sender role for APIM instance (system-assigned managed identity we created earlier at the time of provisioning the APIM instance) on service bus namespace.
# Get the subscription id
subscriptionId=$(az account show --query id --output tsv)

# Get the objectId of the APIM instance (system-assigned managed identity)
assigneeId=$(az apim show --name $apimName --resource-group $resourceGroupName --query 'identity.principalId' --out tsv)

# Finally, assign the permissions on Azure Service Bus namespace
az role assignment create --role "Azure Service Bus Data Sender" --assignee $assigneeId --scope /subscriptions/$subscriptionId/resourceGroups/$resourceGroupName/providers/Microsoft.ServiceBus/namespaces/$serviceBusNamespace
For the sake of simplicity, I'm setting the permissions on the entire namespace. However, you can be very specific (e.g., set the permissions on the topic or subscription level) by changing the scope of the role assignment.
--scope /subscriptions/$subscriptionId/resourceGroups/$resourceGroupName/providers/Microsoft.ServiceBus/namespaces/$serviceBusNamespace/topics/$service_bus_topic/subscriptions/$service_bus_subscription
Set Policies in APIM
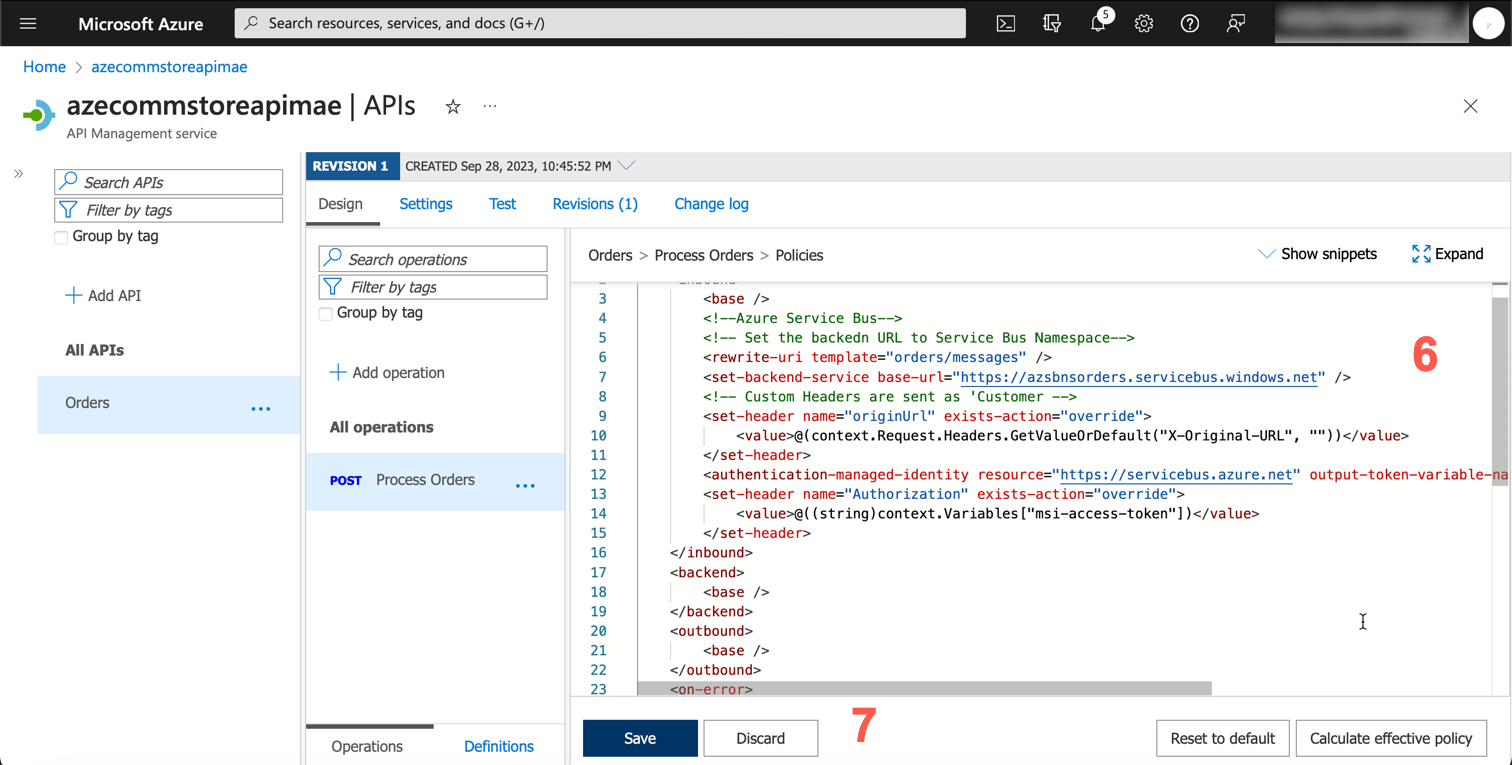
This is where the magic happens. We are leveraging Azure APIM policies to receive requests, extract information from incoming requests, and send messages to the Service Bus Topic. We are using the managed identity to get the access token from Azure AD and then using that access token to send the message to the Service Bus Topic.
For the purposes of demonstration, this endpoint is not secured. We haven't set up any authentication or authorization. In a real-world scenario, you would want to secure this endpoint. You can configure the setting on the API level or you can validate the incoming request within the policy itself.
Here, we are simply setting the backend URL to the service bus namespace.
Navigate to APIM -> APIs -> Orders -> Process Orders -> Inbound processing -> Policy Code editor.
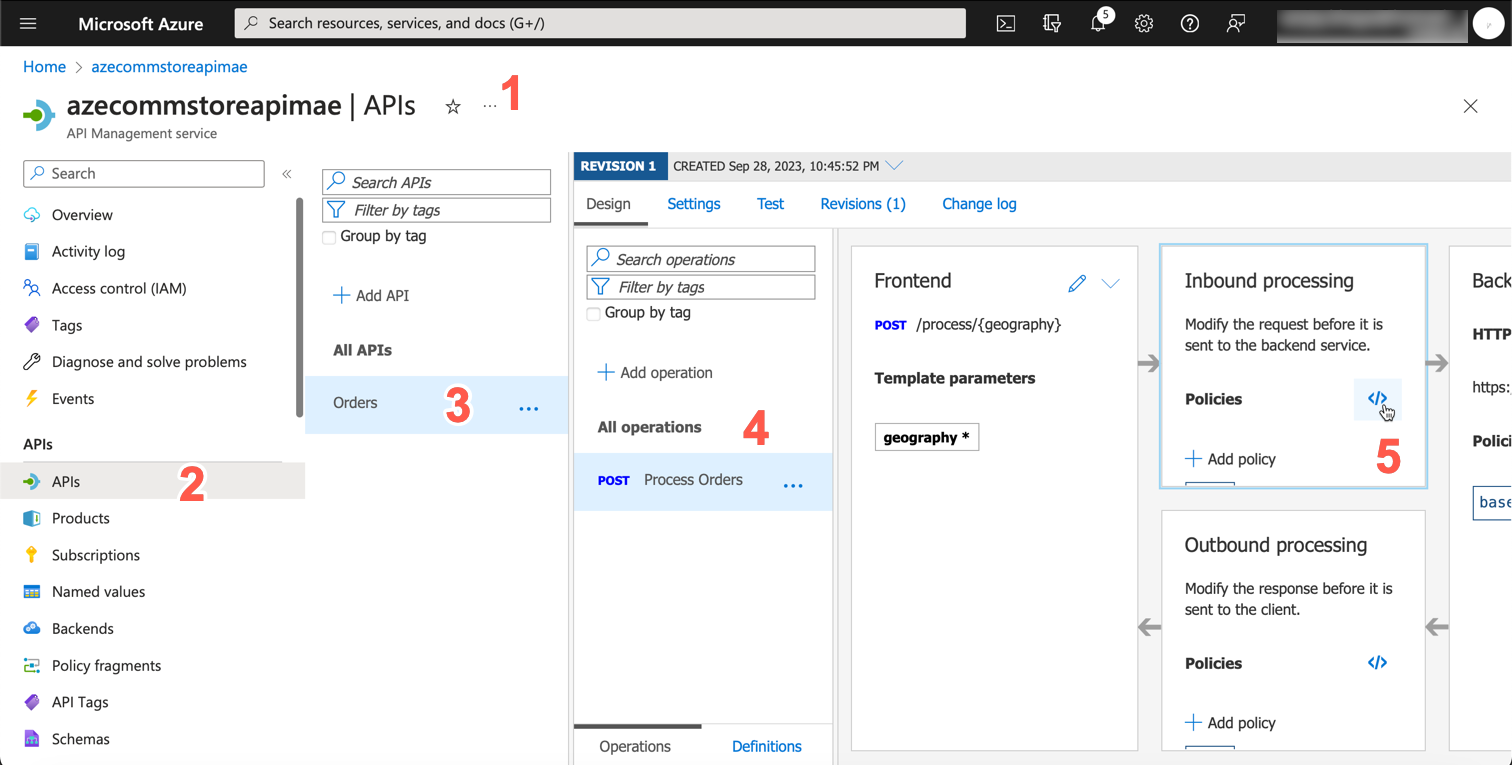
Copy and paste the following policy and click Save
<policies>
     <inbound>
        <base />
        <!--Azure Service Bus-->
        <!-- Set the backend URL to Service Bus Namespace-->
        <rewrite-uri template="orders/messages" />
        <set-backend-service base-url="https://azsbnsorders.servicebus.windows.net" />
        <!-- Custom Headers are sent as 'Custom Properties' on service bus messages -->
        <set-header name="originUrl" exists-action="override">
            <value>@(context.Request.Headers.GetValueOrDefault("X-Original-URL", ""))</value>
        </set-header>
        <authentication-managed-identity resource="https://servicebus.azure.net" output-token-variable-name="msi-access-token" ignore-error="false" />
        <set-header name="Authorization" exists-action="override">
            <value>@((string)context.Variables["msi-access-token"])</value>
        </set-header>
    </inbound>
    <backend>
        <base />
    </backend>
    <outbound>
        <base />
    </outbound>
    <on-error>
        <base />
    </on-error>
</policies>
Test the API
Now, we have everything in place. Let's test the API. We will use Postman to test the API.
Let's issue a simple request from Postman to the endpoint
https://azecommstoreapimae.azure-api.net/orders/process/sydney
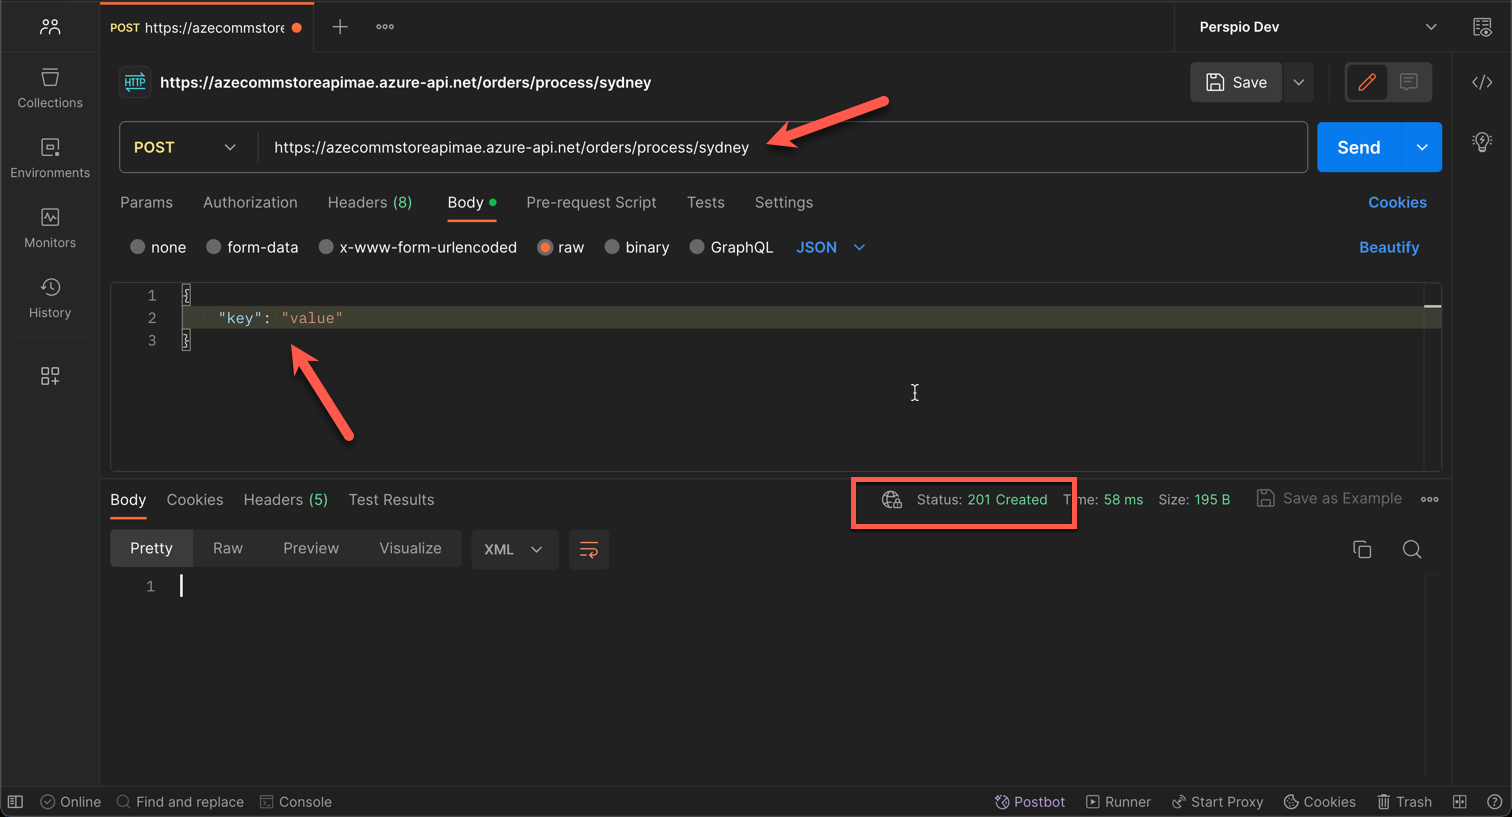
As we can see, the request is successful and we received a 201 Created response!
Curl Command
For reference, here is the CURL request
curl --location 'https://azecommstoreapimae.azure-api.net/orders/process/sydney' \
--header 'Content-Type: application/json' \
--data '{
    "key": "value"
}'
Let's validate the message from the Portal.
Azure Service Bus - Portal
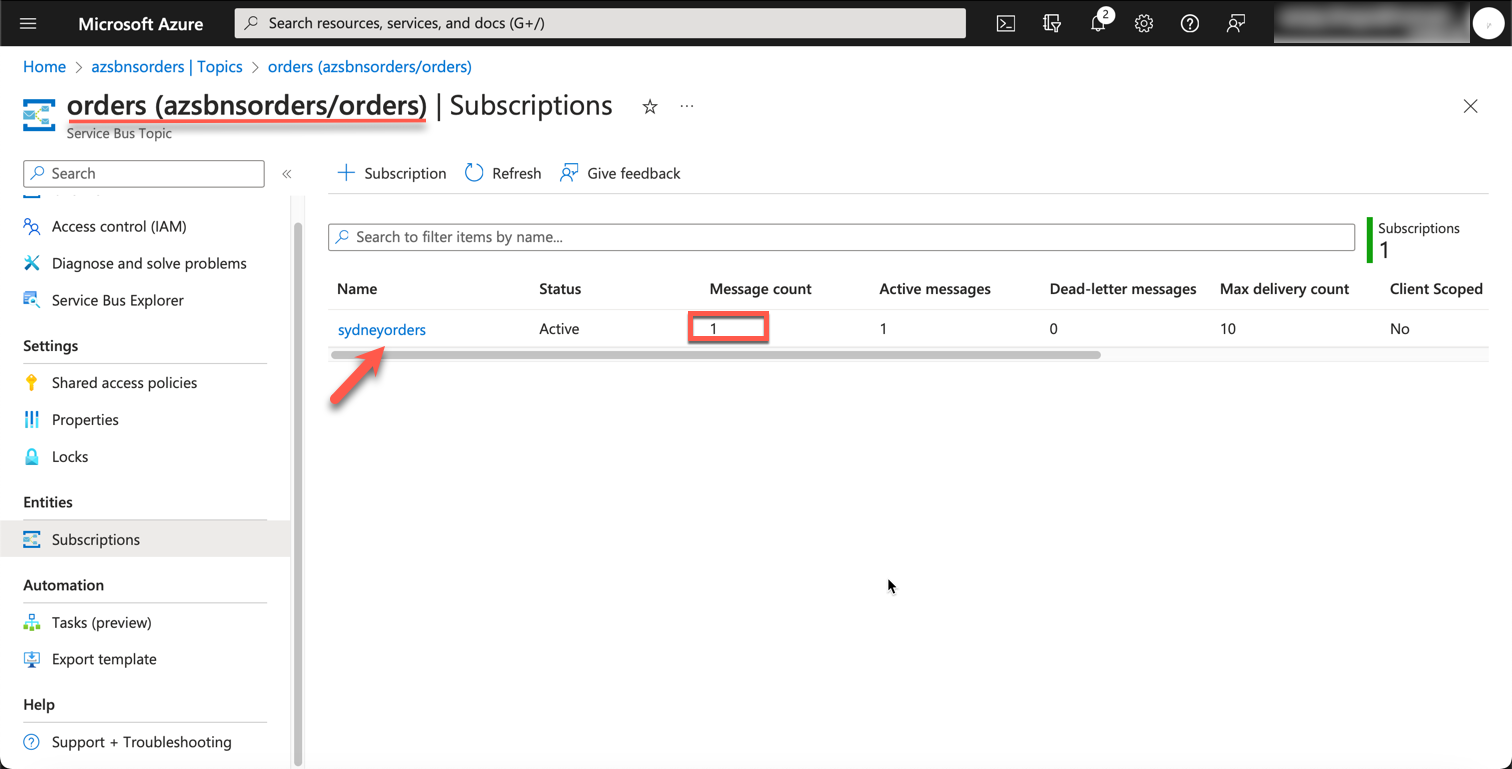
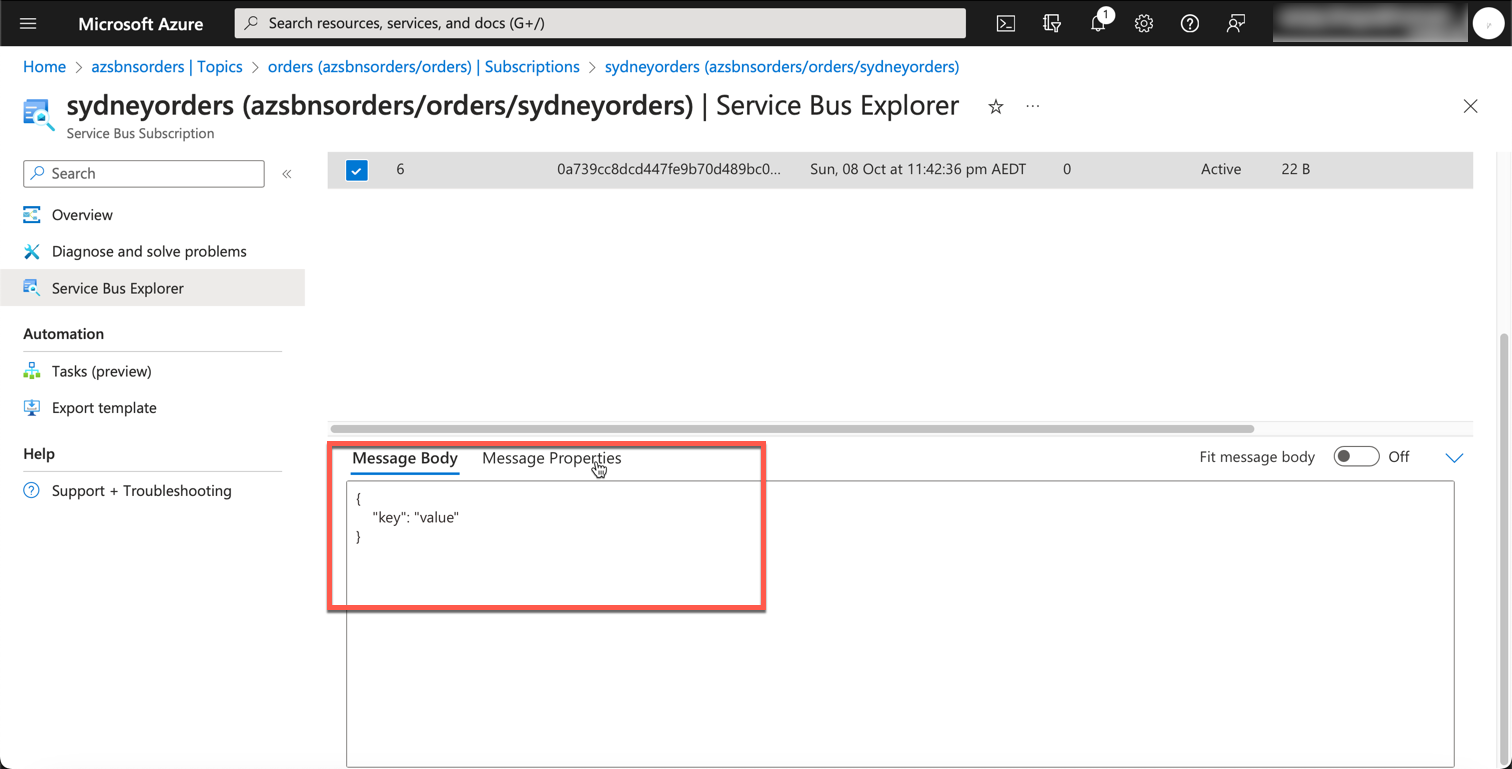
As we can see, we did indeed receive the message in our subscription within the Service Bus Topic. Upon further inspection, we can see that the message was sent to the sydneyorders subscription and the processorders rule was applied.
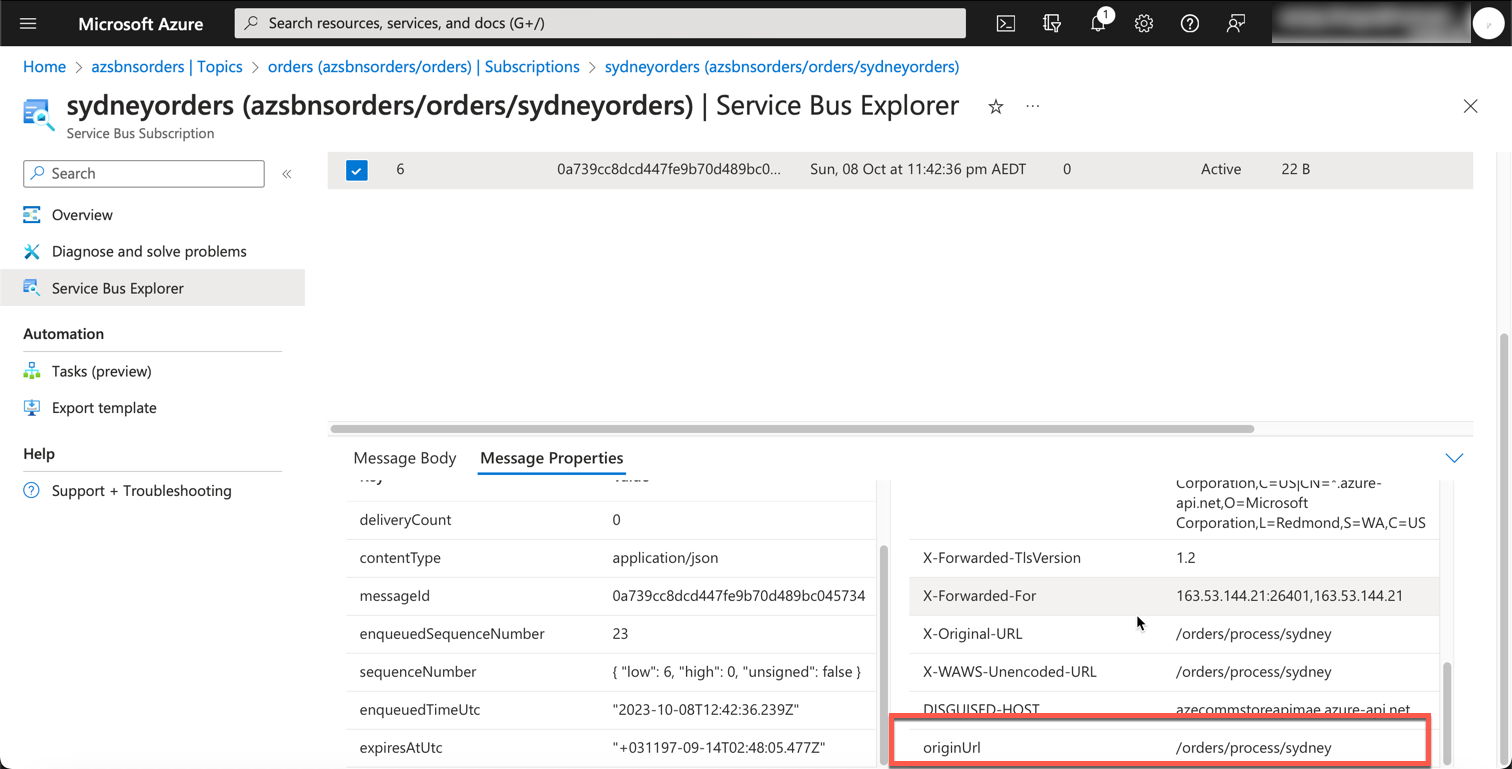
From this point, you can very well create an Azure function to receive messages from this topic and subscription.
Bonus - Azure Function App
Now, we are ready to write our code to process the orders. But first, let's spin up an azure function. We need a storage account and Azure Function app first.
Storage Account
az storage account create --name azecommstorestorage --resource-group $resourceGroupName --location australiaeast --sku Standard_LRS
Azure Function
az functionapp create --resource-group $resourceGroupName --consumption-plan-location australiaeast --name sydneyordersprocessor --storage-account azecommstorestorage --runtime dotnet-isolated --functions-version 4 --os-type Linux
Write and Test Code
You can use Azure Function Core Tools or your favorite IDE to create a function app. Here is the simple function I have created. It simply logs the message it receives.
using Microsoft.Azure.Functions.Worker;
using Microsoft.Extensions.DependencyInjection;
using Microsoft.Extensions.Logging;

public class ServiceBusTopicListeners
{
    private ILogger _logger;
    public ServiceBusTopicListeners(IServiceProvider serviceProvider)
    {
        var loggerFactory = serviceProvider.GetRequiredService<ILoggerFactory>();
        _logger = loggerFactory.CreateLogger(this.GetType());
    }
    [Function(nameof(ProcessOrders))]
    public async Task ProcessOrders([ServiceBusTrigger("orders",
        subscriptionName: "sydneyorders",
        Connection = "servicebus_cs", IsSessionsEnabled = false)]
        string message, FunctionContext context)
    {
        _logger.LogInformation($"Received message: {message}");
    }
}
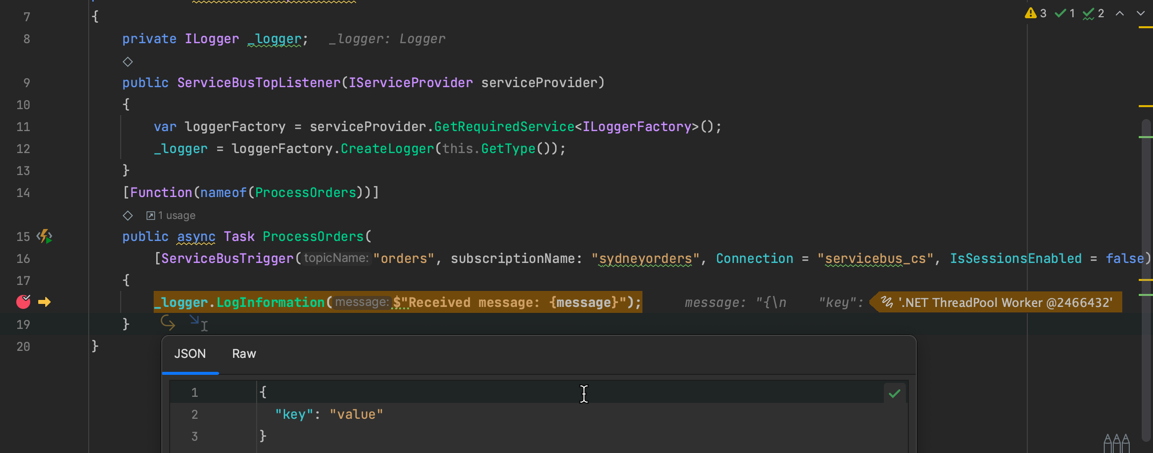
When we run this function locally in debug mode, and set the breakpoint, we see that message is received successfully.
Clean up the resources
Always a good idea to clean up the resources you are not using
az group delete --name $resourceGroupName
Source Code
You can find the complete source code of this post on my GitHub repo. Add the connection string of your Azure Service Bus namespace in local.settings.json to test this out locally. I have also listed all az cli command in this blog post in one file infra.sh for your reference.
Conclusion
In this blog post, we saw how we can leverage Azure API Management policies to send messages to Azure Service Bus Topic. We also saw how we can leverage Managed Identity to get the access token and use that to send messages to the Service Bus Topic. This approach makes it easy to send messages to the Service Bus Topic without having to write any code.
Hope this was helpful.
Cheers
comments powered by Disqus